What to do if your Hive Thermostat Mini is offline
Answer
If your Hive Thermostat Mini is showing offline in your Hive app, it means it has lost connection to the Hive Receiver. Follow these steps to get it back online:
Check out this useful video for tips on how to get your Hive Thermostat back online: Click here
Key Device Index
Thermostat

Receiver
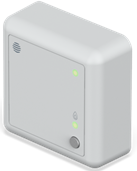
Hubs (there are a few different models of Hive Hub, they will look similar to the images below)


Step-by-Step Guide
Step 1:
Pull the Thermostat away from the backplate, lift it off the hooks that hold it against the wall, and turn the thermostat over to reveal the batteries.
Step 2:
Take your thermostat to the receiver, which you will find near your boiler/hot water tank.
Step 3:
Remove the batteries and put them straight back in again. This will turn the thermostat off and on, which should help establish a connection to the receiver.
Step 4:
Place the thermostat back on the wall. The thermostat should then display a ‘Reconnecting’ message.
Step 5:
Once you see an inside temperature again, try to turn the heating on. Press the Up ‘^’ icon to increase the temperature until the target is above the inside temperature.
Step 6:
If the heating is on, you will see a little flame appear under the inside temperature on your Mini thermostat next to ‘Actual’, and a message ‘Heating to ….º’.
Step 7:
When you can see that the ‘status’ and ‘central heating’ lights on the receiver have turned green, you’re done!
If your thermostat is still showing a ‘No Signal’ message, your heating devices should be manually reset and paired.
 TIP: Please be aware that this will reset any heating/hot water schedules that you currently have set up.
Check your Hive Hub is placed correctly.
TIP: You should avoid placing the hub on the floor, right next to your router, in a cupboard or surrounded by too many electrical items. Restart the hub by switching it off at the wall socket and switching it back on again. Give the hub 5-10 minutes to reboot and then go to the dashboard in the app and refresh the page. The ‘offline’ message should no longer be showing for heating. If the ‘offline’ message is still showing, please follow the steps below:
Manual Reset and Pairing Steps
Step 1:
Switch the boiler off at the isolation switch/fuse spur (this should be located near your Hive Receiver next to your boiler). All the lights on the receiver will then go out.
Step 2:
Press and hold down the down arrow icon and the menu ‘O’ icon on the thermostat at the same time (these are the bottom left and bottom middle icons). Keep these icons held down together until the countdown to factory reset finishes and the thermostat display says ‘Welcome to Hive’.
Step 3:
Remove a battery from the thermostat.
Step 4:
Switch the boiler back on at the isolation switch/fuse spur.
Step 5:
Hold the central heating button down on the receiver until the status light is flashing pink. Release the button and then hold it again until the status light is double flashing amber.
Step 6:
To connect the receiver to the hub, you will need to put the hub into pairing mode. You can do this by selecting ‘Install devices’ within the Hive app menu. From there, tap ‘Add another device’ and then ‘Go’, which will start the hub’s search. Leave the hub searching until the receiver status light changes to a single flash of amber.
Step 7:
Put the battery back in the thermostat. The thermostat should display the ‘Welcome, searching’ message again. When you see the word ‘Search’ disappear from the screen, the receiver status light will turn green. The thermostat will then finish pairing and rest on the inside temperature screen.
Step 8:
Wait 5 minutes and then go to the dashboard in the Hive app and refresh the page. The ‘offline’ message should no longer be showing for heating. Once you see an inside temperature display on your thermostat again, try to turn the heating on.
Step 9:
If the heating turns on and you can see that the ‘status’ and ‘central heating’ lights on the receiver have turned green, you’re done!